Monday, November 30, 2015

joy sparkle and shine.

1 comment:
my challenge for this layout was lifting a fellow design team member-Jaimie Leija.  I was so inspired by the colors and the three photos I decided to do the same.  To see her page check out the Scrapbook Circle blog HERE.
 closeup to the title:
thanks SO much for the visit today!  Happy December-eve!

Sunday, November 29, 2015

pinterest food finds. beef stew

1 comment:
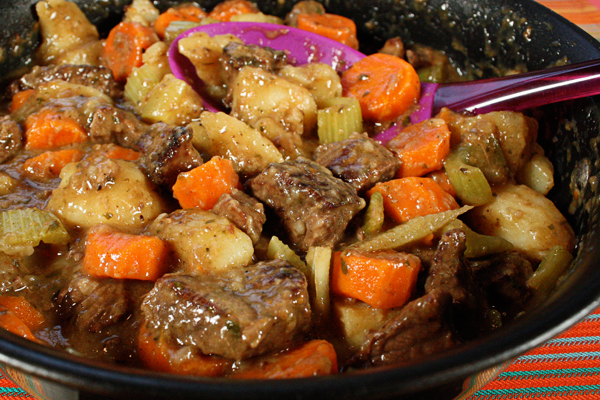
The weather has FINALLY cooled down--sweater weather for Arizonans is probably summer weather for most places but hey, it's where I live!  Anyway, I was wanting a good stew, I found this deliciousness:
food/recipe credit: Jenny Can Cook

Ingredients:
  • 3 teaspoons olive oil, divided
  • 1 pound beef stew meat, visible fat removed
  • 1 cup chopped onion
  • 1 clove garlic, minced
  • 2 1/2 cups homemade beef stock or canned unsalted chicken stock
  • 1/2 teaspoon salt
  • 1/2 teaspoon dried thyme leaves
  • 1 bay leaf
  • 4 medium red potatoes (about 1 pound) cut in 1-inch chunks
  • 2 large carrots, sliced 1/4-inch thick
  • 2 celery stalks, sliced
  • For thickening: 
  • 2 1/2 Tablespoons flour
  • 1/4 cup stock
Instructions:


  1. Heat 2 teaspoons of oil in a large sauté pan or Dutch oven over medium-high heat. Brown the meat on one side for 5 minutes without turning over. Sprinkle with salt & pepper.
  2. Turn meat, add 1 tsp. oil & brown another 2-3 minutes. Sprinkle with salt & pepper. Do not crowd the meat. Brown in two batches if necessary.
  3. With all the meat browned and in the pan, reduce heat to medium. Add onion & garlic. Cook and stir 2-3 minutes until onion is browned.
  4. Add stock (enough to cover the meat), salt, thyme & bay leaf and bring to a boil. Cover & simmer for 2 hours, checking occasionally.
  5. After 2 hours, stir in potatoes, carrots & celery and bring to a boil. Cover & simmer 10-15 minutes until vegetables are done.
  6. Combine flour with 1/4 cup stock or water, whisking until there are no lumps. Stir into stew and cook 5 more minutes until thickened.

Friday, November 27, 2015

Thursday, November 26, 2015

Happy Thanksgiving

1 comment:
Hope you are enjoying the day with family and friends!

Sunday, November 22, 2015

pinterest food finds. quick and easy ground beef stroganauff

1 comment:
photo/recipe credit: terrell family fun
I have to be truthful we haven't had ground beef in a while--I've switched to using ground turkey so that's what I used!  And instead of beef boullion I used chicken soup base from my FAVORITE spice place.  (I had a friend who went to culinary school turn me on to them, and I haven't looked back since!)  anyway, I normally use a different recipe but couldn't find it and was in a hurry.  I was happy to find this on Pinterest:

Ingredients
  • 1 lb. Ground Beef
  • 1 Can Cream of Mushroom Soup
  • 8oz Sour Cream
  • 1 tsp. Onion Powder
  • 1 tsp (or one cube) Beef Bouillon
  • 1/4 cup water
  • 1 Package of Egg Noodles
Instructions
  1. Bring a large pan of water to a boil and cook the full package of egg noodles.
  2. While the pasta is cooking, brown the ground beef until fully cooked, Drain.
  3. Return the ground beef back to medium heat and add in the mushroom soup, sour cream, onion powder, beef bouillon and water. Mix together well and let simmer lightly, stirring occasionally.
  4. Optional - Add salt to desired taste
  5. I leave the sauce simmering lightly until the pasta is done cooking.
  6. Drain pasta and plate
  7. Pour sauce over pasta and serve!


Friday, November 20, 2015

friday funnies. diving finals.

No comments:
seriously these guys crack me up:

Thursday, November 19, 2015

grateful.

No comments:


For my layout today I featured a picture I took this year of my dad on his birthday with two of my kiddos.  Even though my daughter was only there for 15 minutes we took the time to snap a picture.  Can you tell grandpa is pretty proud of his oldest grand daughter, and she thinks he is pretty okay too?  And then there is my goofball youngest...PHOTOBOMB! When I think of families I think of quilts.  Quilts are intricate and colorful and each one is different.  With that thought in mind I used the Zig Zag background.  For the hearts I used the Basic Hearts, and the title I used the Gratitude file cuts.
Here is a closer look at the title work:
I want to thank you for the visit today--I REALLY appreciate it!

Tuesday, November 17, 2015

ward merry party.

1 comment:
I was struggling just a bit trying to find some holiday type pictures to scrap--then I came across this beauty of my cute parents back in the day:
1988, they were at a church Christmas party.  I remember that jacket and tie (my dad's favorites) and I remember that dress that my mom is wearing...good times!

closeup of the cute deer in the corner:
Thanks a ton for the visit, I know that with the business of life at this time of year it takes a lot to do one more thing! ;)

Sunday, November 15, 2015

pinterest food find. Asiago Cheese Rolls

1 comment:
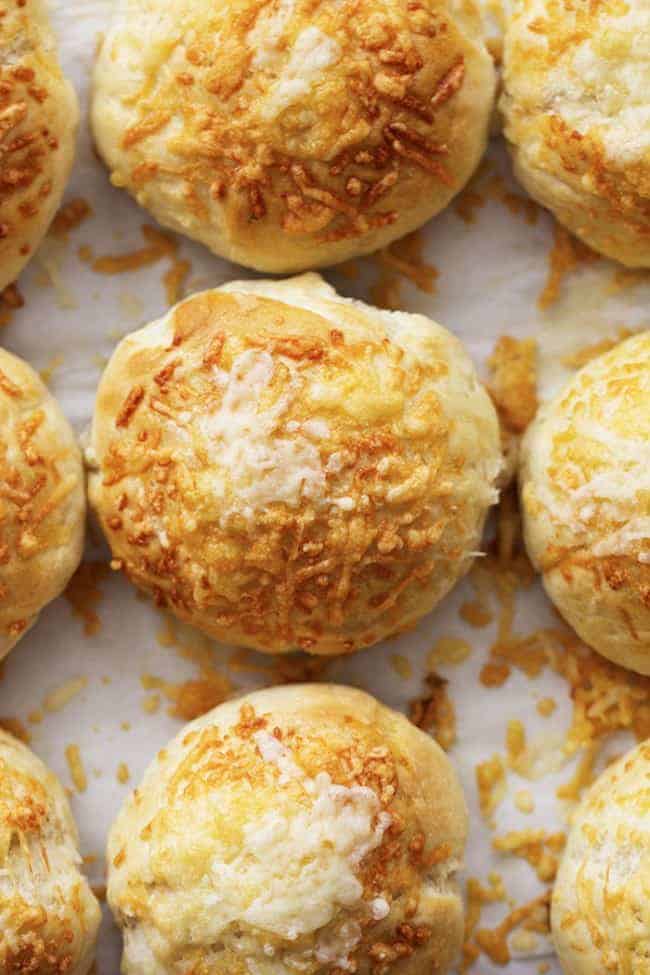
photo/recipe credit: the recipe critic

These are yummy!  My 13 year old likes them as they are--but when I make these again I will make the rise time more so that they will be lighter in weight and flavor.  He says they taste like Eistein cheesy bagels if you know what those are....

30 minute Asiago Cheese Rolls

Ingredients
  • Dough Ingredients:
  • 1½ cups warm water
  • 2 Tbsp. sugar
  • 1 Tbsp. yeast
  • 3½ cups flour
  • 1 tsp Salt
  • Egg Wash Ingredients:
  • 1 egg
  • 1 tablespoon milk
  • 4 oz Asiago Cheese, shredded
Instructions
  1. Preheat oven to 400 degree and line a cookie sheet with parchment paper.
  2. To make the dough: Mix warm water, sugar and yeast together. Let that sit for 5 minutes.
  3. Add flour and salt to the water, sugar, and yeast. Mix this until smooth and let it raise for 10 minutes. I used my kitchenaid mixer with the dough hook and it was so easy and worked great!
  4. Divide the dough into 12 sections. Roll each section into a ball and place on a parchment lined baking sheet. Let rest for 10 minutes.
  5. Whisk the egg and the milk in a small bowl. Brush on the top of each roll with the egg wash. Sprinkle generously with asiago cheese. Bake for 12-15 minutes or until golden brown.

Saturday, November 14, 2015

remember.

1 comment:
Seems like I'm doing A LOT of remembering around here! ;)  For this fun layout my theme for JustNick Studio was REMEMBER.  So, I looked on my desk and found this picture that definitely REMINDS me it's time for a new family photo...it's like 5 years old or something...
 closeup of the 5 cuts I used on my page:
The five cuts which I used were  Remember, Sweater Weather, Basic HeartsDoilies and Simple Scallop files.  Phew!  I just LOVE how they all came together--don't you?!
thanks SO much for the visit today--I REALLY appreciate it!

Wednesday, November 11, 2015

Mary.

1 comment:
Once upon a time there was a little girl named Diana who loved to dress up, especially for Christmas time.  Mary was her favorite character to play-her dolly is named Nelly but works in a pinch as the baby Jesus.  A couple of years later this same little Diana was asked with her brothers to create a nativity for church during the Sunday meeting.  She was VERY excited, they assembled themselves behind the according doors.  As soon as the doors were opened and she looked up and saw all of the faces looking at her, she became a ROCK.  She literally curled up on the floor and would not look up for ANYTHING.  Not even the persistent proding by her loving mother.  She couldn't handle all the eyes!  (that really DID happen--as you can tell it's been like 30+ years and I can STILL remember!)  

Anyway, in this picture I am 3 years old, it's 1976....
 closeup of the painting and craftiness of the page:
1. for the background I used a stencil and painted over it with gesso.  
2. I felt like it needed something else so I took my glitter glue and "painted" the center of the circle.  
3. I still felt like it needed something, so I took my white mist and painted the background giving it a light color of white.  
4. I then sewed it down to the base and roughed up the edges to give it dimension.  LOVE it!
*this is the original picture with writing on the back.  Instead of adhering it down to the page I used photo corners so I can remove it if I would like...

I used the Good Cheer, and Wish List kits from Scrapbook Circle.

Thanks SO much for the visit today!!

Monday, November 9, 2015

merry christmas, a card.

1 comment:
oh, did I have FUN getting messy with this card!  I again used scraps from the Good Cheer and add on Wish List to make this card:
1. I cut the background to just fit the front of my base making it 4" x 5.25".
2. I then punched my scalloped circle (it's an anywhere punch)
3. I used some water color to paint--then added some gold color shine.
4. After my background dried (I made helped it along with my embosser gun)
5. I then backed each cutout with a scrap piece of paper.
6. My paper was buckling so I decided to sew around the edges and in the middle to secure it.
7. finally layered up the embellishments--SUPER fun!

thanks for the visit today, I really appreciate it!

Sunday, November 8, 2015

pinterest food find. no-bake energy bites

1 comment:
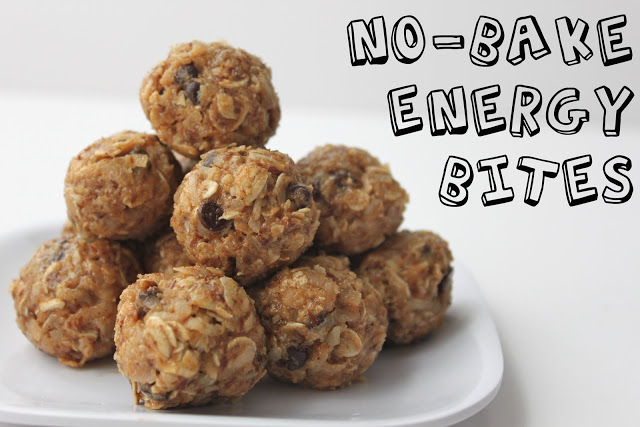
with my sports seasons in full force I needed something healthy and QUICK for my kiddos to grab and GO!  There are several variations to this recipe that I plan on trying but my kids really liked this one:
food/photo credits: smashed peas and carrots
No-Bake Energy Bites
 
 
Recipe type: Dessert
Serves: 18-20 bites
Ingredients
  • 1 cup oatmeal
  • ½ cup peanut butter (or other nut butter)
  • ⅓ cup honey
  • 1 cup coconut flakes
  • ½ cup ground flaxseed
  • ½ cup mini chocolate chips
  • 1 tsp vanilla
Instructions
  1. cup oatmeal
  2. /2 cup peanut butter (or other nut butter)
  3. /3 cup honey
  4. cup coconut flakes
  5. /2 cup ground flaxseed
  6. /2 cup mini chocolate chips
  7. tsp vanilla
  8. Mix everything above in a medium bowl until thoroughly incorporated.
  9. Let chill in the refrigerator for half an hour.
  10. Once chilled, roll into balls and enjoy!
  11. Store in an airtight container and keep refrigerated for up to 1 week.

Saturday, November 7, 2015

believe.

1 comment:
I had SO much fun using the scraps from my Good Cheer scrapbook kit by Scrapbook Circle--it's the kit for November.  My challenge was to use my scraps to create a card--one of my favorite things to do.  It is fun being creative with no real rhyme or reason!
1. I cut my background sheet to 4"x 5.25"
2. I punched triangles from several different sheets of scrap pieces of patterned paper.
3. I arranged the triangles on the background and adhered lightly (so i could go back and sew over the top)
4. I then sewed the background down and the triangles.
5. Lastly I added the embellishments including sequins which I sporadically adhered around the card.
If it sounds confusing or time consuming-it really wasn't--loved the creative process!

Thanks for the visit today!

Friday, November 6, 2015

Friday Funny--Ah, yeah!

1 comment:
This is one my family still jokes about--starts out awkward but give it a chance:
Happy Friday!

Sunday, November 1, 2015

pinterest food find. garlic parmesan breadsticks

1 comment:
the other day I decided to try a new bread sticks recipe--my family LOVES breadsticks--this one was a hit--including the topping!
food/photo credit: life in the lofthouse
Yields 12
INGREDIENTS
  1. 1 1/2 cups warm water (105 - 110 degrees F°)
  2. 1 Tablespoon instant yeast
  3. 1 Tablespoon granulated sugar
  4. 1/2 teaspoon salt
  5. 4 cups all-purpose flour
INSTRUCTIONS
  1. In a large bowl, or in the bowl of a stand-mixer, add warm water, instant yeast, sugar and salt. Stir to combine (using the dough hook if in the stand-mixer)
  2. Add 2 cups flour and mix well. Gradually add in the rest of the flour until dough pulls away from the sides of the bowl and sticks to your finger a little bit. (Remember to only add up to 4 cups flour total. Adding too much flour will make the breadsticks too dense and not soft.)
  3. Cover bowl and allow to rise 30 minutes or until doubled in size.
  4. Remove dough from bowl and place on a clean and lightly-floured surface. Spray a large baking sheet with non-stick spray. Roll dough into a large rectangle, about 1-inch thick, and cut into 12 strips with a pizza cutter.
  5. Roll out each piece of dough into a long rope then twist. Place dough twist onto prepared baking sheet and repeat with the rest of dough, placing side by side on baking sheet.
  6. Cover and let rest 30 minutes to rise again until doubled.
  7. Preheat oven to 425° F. Bake 10 to 12 minutes or until golden-brown. Remove from oven and rub a 1/2 stick of butter over the warm breadsticks. Sprinkle tops evenly with Garlic Bread Seasoning!