Sunday, November 23, 2014

Pinterest food finds, southwest pasta salad.

1 comment:
(credit goes to Harris Sisters GirlTalk)

Southwest Pasta Salad
16 oz. rotini pasta
2/3 cups Ranch dressing
2 15 oz. can black beans, drained and rinsed
1 15 oz. can whole kernel corn, drained and rinsed
2 large tomatoes, chopped
1 cup shredded cheddar cheese
1 1/2 Tbsp ground cumin
1/2 Tbsp chili powder
1 tsp onion powder
1/4 tsp dried red pepper flakes
salt and pepper to taste
  1. Cook pasta according to package directions until al dente. Drain and rinse in cold water.
  2. Place in a large mixing bowl. Mix with Ranch dressing, beans, corn, tomatoes, cheese, and spices.
  3. Chill salad in refrigerator until ready to serve.
I tweeted it a bit to our taste...

Monday, November 17, 2014

day one x 2.

4 comments:
I had the challenge from Scrapbook Circle this month to be inspired by a page I previously made!  This is the page that I chose to work with:
DianaWdayone
I LOVED this layout--it literally came together in 15 minutes--the 15 minutes RIGHT before dinner.... my photos were already matted on the white paper (I usually do this with my pictures when they come in, so when I go to scrap them they are READY to go!)  If you notice there was NO sewing on this page-I REALLY wanted to but had no time...

okay now my second take on this page:DianaWdayone  Yep, the same kid first day of school pictures one serious one silly.... this time I had time to do the sewing and even add a bit of drops of mist.  This layout took about double the time but I LOVE each layout for what they turned out to be.
(for my second layout I used the Little Moments kit)

Thanks SO MUCH for your visit--I REALLY appreciate it!

Sunday, November 16, 2014

pinterest food find. mexican rice

1 comment:
So my daughter LOVES spanish/mexican rice.  Basically the stuff they serve with your latin style food.  I went on Pinterest and found this beauty--to say it's a HIT is an understatement:
(credits go to Angie's Simple cooking)
Ingredients
  • 1/4 cup olive oil
  • 1 1/2 cups long grain rice
  • 1 teaspoon salt
  • 1 teaspoon garlic powder
  • 1 teaspoon cumin
  • 1/2 teaspoon chili powder
  • 1 can Rotel diced tomatoes with lime and cilantro
  • about 2 1/4 cups water or low sodium chicken broth
Directions
Add the olive oil to a medium sauce pan and heat. When the oil is hot, add the rice and cook stirring constantly until rice starts to brown. Add the salt, garlic powder, cumin, and chili powder and mix well. Add the rotel tomatoes with enough water or broth (about 2 1/4 cups) to make 3 cups of liquid. Add the liquid and stir. Cover and let it come to a boil. Turn heat to low and cook for 20 minutes.

Friday, November 14, 2014

sixteen.

2 comments:
I wanted to share with you my take on this FANTASTIC sketch by the talented Diana Fisher for Scrapbook Circle:
here is my take:

Fun little tip.  I used the digi cuts included in the Little Moments kit, and repeated them just using the outline, cut them with my silhouette, and matted them on the colorful sheets of paper included in the kit. *LOVED how it all came together--especially the GOLD!

Thanks SO much for the visit go check out the BLOG to see all the details and for a chance to win a prize!


Tuesday, November 11, 2014

good times.

1 comment:
Today I wanted to talk about the wonderful Amy Tan chipboard pieces included in the Little Moments kit by Scrapbook Circle:

This is just one of them but they are SO cute!  I thought it went perfect with this picture of my brothers and I on our road trip to California earlier this year:

 These are my two older brothers, I also have a younger brother who had to stay home...

closeup of the title:
LOVED using a bunch of mist to recreate the GORGEOUS sunset behind us--it was SERIOUSLY amazing!

What was funny is we were trying to take a great picture, this girl walks up and says would you like me to take it for you.  NORMALLY people don't know how to use a DSLR camera.  I handed it to her she looks at it and says, "OH, I just upgraded from this camera!" and she proceeds to get all the settings just right and snaps this picture!  Seriously--LOVED that moment and sweet little blessing of the day!

I'm off and running--thanks SO much for the visit today!

Sunday, November 9, 2014

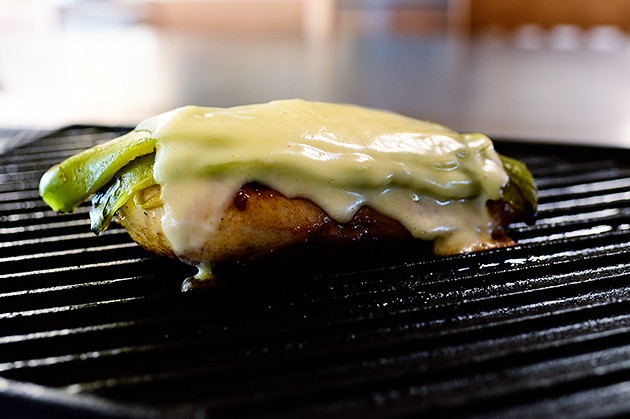
pinterest food find, green chili chicken.

1 comment:
OH my DELICIOUS!  My kids told me this smelled SO good as it cooked and gave me the WAY thumbs up for this recipe:
(credit goes to Pioneer Woman)


Ingredients

  • 1/2 cup Olive Oil
  • 3 Tablespoons Lime Juice
  • 2 whole Chipotle Peppers In Adobo Sauce (more To Taste)
  • 2 cloves Garlic
  • 1 teaspoon Ground Cumin
  • 1 teaspoon Salt
  • 1/2 teaspoon Black Pepper
  • 6 whole Boneless, Skinless Chicken Breasts
  • 6 whole Hatch, Anaheim, Or Poblano Chiles
  • 1/2 pound Monterey Jack Cheese, Cut Into Slices Or Grated

Preparation Instructions

First, make the marinade for the chicken: Combine olive oil, lime juice, chipotle peppers, garlic, cumin, salt, and pepper in a blender and mix until it's totally pureed. Pour into a large ziploc bag with the chicken breasts. Seal the bag, smush it around to coat the chicken, and place it in the fridge to marinate for at least 4 hours (overnight if possible.) ***Note: You can use any marinade, homemade or storebought, you'd like! Anything works. 
After the chicken has marinated, roast the chiles by using metal tongs to hold the peppers one by one over the flame of your stovetop until the skin is totally charred. (If you don't have a gas stove, you can use an outdoor grill OR place them on a baking sheet directly under your oven's broilers.) When the skin is totally blackened, place the chiles in a large ziploc and seal the bag to allow the chiles to sweat for a good 20 minutes. Remove them from the bag and use a knife to scrape off most of the blackened skin. Slice the chiles in half lengthwise, and scrape out the seeds and membranes. Lay out the roasted, seeded chile halves so they'll be ready.
Grill the chicken (or saute it in a skillet) over medium-high heat for 4 minutes on the first side. Turn the chicken over, and on the cooked side lay on 2 chile halves and a nice slice of cheese. Turn the heat to medium-low and allow the chicken to finish cooking for 4 to 5 minutes, until it's totally done in the center. The cheese should melt on its own; if it needs a little help, invert an iron skillet over it (or put the lid on the skillet, if using).
Remove the chicken from the skillet and serve it with rice and beans on the side. Top the chicken with a spoonful of pico de gallo or salsa.
We just ate these as they were with rice and salad, but there she had you eating it in a Taco--DEFINITELY something we will be doing AGAIN!

Thursday, November 6, 2014

ball.

2 comments:
oh how this silly dog loves to play ball.  We actually have to hide them from her because she will bug you if you don't play with her.  It is getting a little difficult to throw it to far--she can't really see or hear but she STILL loves to play ball:

little close up of the title sticker area:

what I liked about this layout:

*I was able to use 7 different stickers on this layout (from the Little Moments kit by Scrapbook Circle)

*I used these pictures.  I actually had printed these out for Christmas Grandma brag books but didn't ever use them.  I looked through my stash of pictures and decided to cut them down from 3 x 4 to 2 1/2" square to work.

*I was INSPIRED by the talented Sasha Farina--she seriously IS amazing!  And yes--I get STUCK just starring at my supplies and pictures wondering what in the world I am  going to do with them!

*I like that this layout feels "clean" but it still includes layering and sewing.

Thanks SO much for the visit today!

Tuesday, November 4, 2014

50 years.

3 comments:
This photo was taken 3 years ago--CRAZY how time has flown and how this picture could include a FEW more people (other than the ones that couldn't be there that day!)

closeup of the title work, a mix of stickers and cuts from my Silhouette machine:

what I love about this layout:
* the layering.

* the fact that I was able to use a mix of the FANTASTIC papers included in the On this Day kit.

*the journaling title combo--love how that came together.

*the fact I used a piece of card stock in a color I normally wouldn't use for a background...(thanks Silhouette!)

Sunday, November 2, 2014

on top of the world.

2 comments:
Do you ever wonder how/what makes another scrapper think/tick?  Today I want to take you through a layout I made using the On This Day kit from Scrapbook Circle:
 closeup of the title work (the numbers are the actual elevation we hiked):


My Favorites about this layout:
*I took one of the digital cuts for the On this Day kit–I enlarged the image to cut the size of a 12 x12 layout.  I cut it out of textured card stock and adhered it to my background paper–stitching around the edges.  REALLY like how some white stitching can make a page POP!
* I used pictures from our phones–they aren’t the best but sometimes the layouts aren’t about the ACTUAL pictures it’s about preserving the memory of the moment so when you look back at the page you can remember the feelings you had doing this particular moment.
*the title–just came to me, the numbers along the side are the actual elevation of where we were…
*I was able to include the strip of paper that runs along the bottom of one of the sheets of pattern paper–the sentiments were exactly what I wanted to include.
Thanks for the visit today!!